Integrating Acunetix with CircleCI for CI/CD
This guide provides a step-by-step example for a basic Node.js web application, following these steps:
- Prepare the Acunetix Target
- Prepare the GitHub Repository
- Set up the local environment
- Configure the deployment environment
- Integrate CircleCI with GitHub
- Test the Pipeline Workflow
- Integrate with Acunetix
Step 1: Prepare the Acunetix Target
- Log in to Acunetix.
- Select Targets > Add Targets and create a Target for your web application. In this example, our web application will be at http://testwebapp.acunetixexample.com:8080
- Enter the web application URL.
- Provide a description.
- Click Save.

- Retrieve the Target ID from the URL of the Target Settings page. You will use this information later to integrate CircleCI with Acunetix.

- Click on your name in the top-left corner, then select Profile.
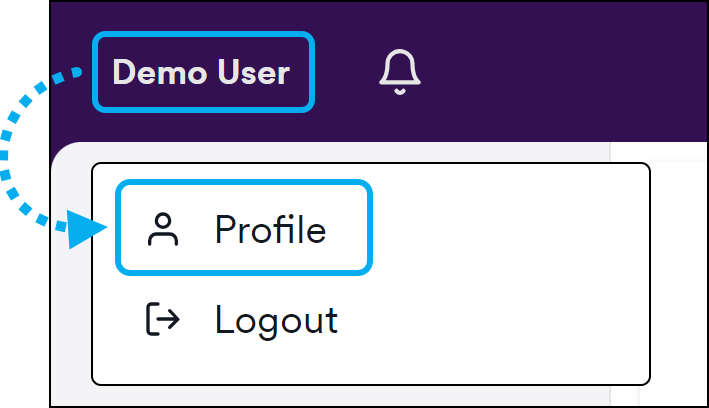
- Scroll down to the API Key section and click Generate new API key to obtain your API Key. You will use your API Key later to integrate CircleCI with Acunetix.
Step 2: Prepare the GitHub Repository
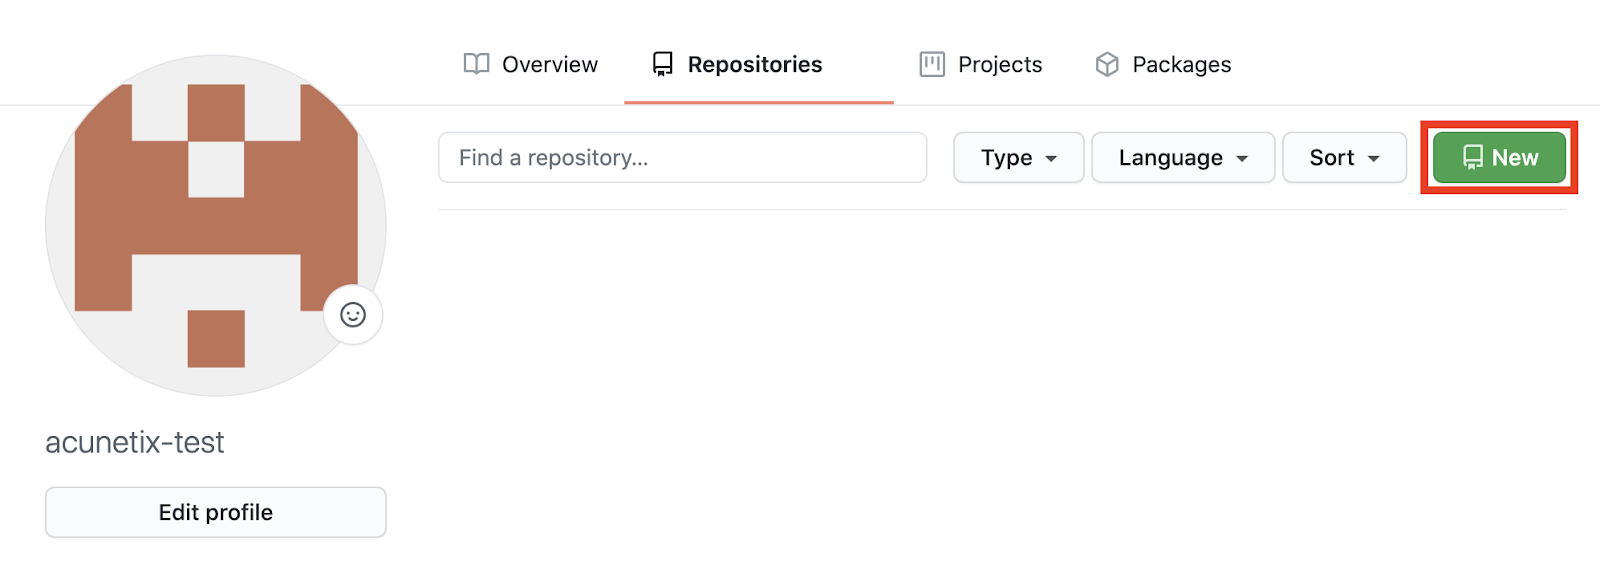
- Log in to your GitHub account with your username. In this example we have used acunetix-test and the email address webmaster@acunetixexample.com.
- On the Repositories tab, click New.
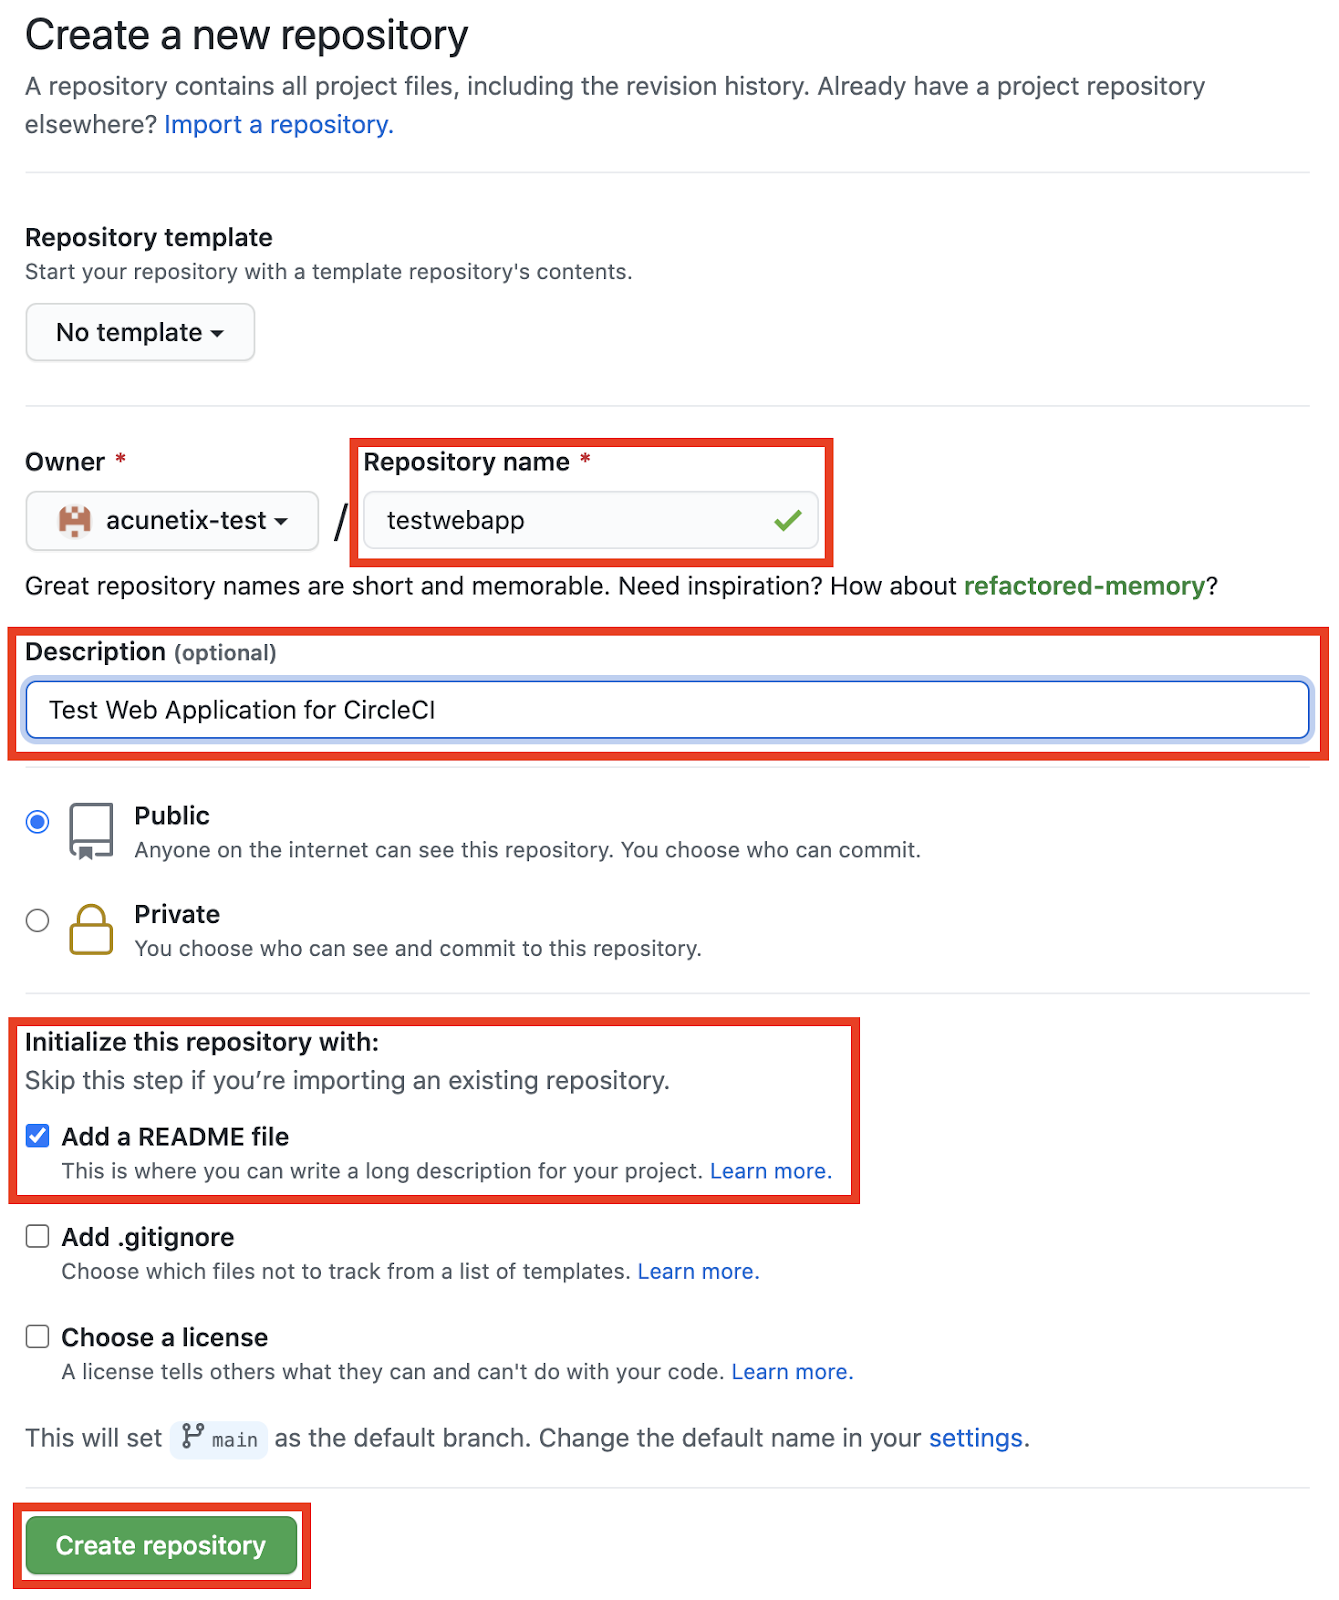
- Create a new repository:
- Enter the repository name. Example: 'testwebapp'
- Provide a repository description
- Check 'Add a README file' to initialize the repository
- Click 'Create repository'
Step 3: Set up the local environment
In this example, the local environment is configured as an Ubuntu 20.04.1 Desktop setup, but most Linux or MacOS setups should suffice. Simply replace the platform-specific steps with those suitable for your environment. All the subsequent steps will be executed on your Local Environment machine.
Installation Prerequisites
- Update and upgrade your environment.
sudo apt update && sudo apt upgrade -y |

- Install git for GitHub repository interaction.
sudo apt install git -y |
- Install Node.js and npm.
sudo apt install npm -y |
Write your Local Source Code
- Checkout your GitHub repository.
cd ~ git clone https://github.com/acunetix-test/testwebapp.git # Substitute "acunetix-test" with your GitHub account name |
- Create your basic web application with the file 'app.js' in the base folder.
nano ~/testwebapp/app.js |
- Add the following lines to your 'app.js' file:
const http = require('http'); http.createServer(function (req, res) { res.write('<html><head></head><body>'); res.write('Welcome to the Test Web Application!'+'<br/>'); res.write('===================================='+'<br/>'); res.write('</body></html>'); res.end(); }).listen(80, '0.0.0.0'); |
Add a CircleCI Workflow Configuration file to your source code
- Create the Configuration file:
mkdir ~/testwebapp/.circleci |
- Add the following lines to your config.yml file:
version: 2.1 # Define the jobs for testwebapp (checkout code and run a deploy.sh script) jobs: pull-and-build: docker: - image: arvindr226/alpine-ssh steps: - checkout - run: ssh -oStrictHostKeyChecking=no -v $USERNAME@$HOSTNAME "./deploy.sh" # Orchestrate the testwebapp job run sequence (runs only on commit to main branch) workflows: version: 2 build-project: jobs: - pull-and-build: filters: branches: only: - main |
Commit the changes to the GitHub Repository
- Change to the correct directory.
cd ~/testwebapp |
- Set your GitHub credentials and remote repository.
git config user.email "webmaster@acunetixexample.com" # Substitute with your GitHub account email address |
- Commit your code changes with:
cd ~/testwebapp |
Step 4: Configure the deployment environment
In this example, the deployment environment is configured as a Ubuntu 18.04 LTS Server on a cloud platform. Therefore, the hostname for your Deployment Environment should match that of your Target (in this example, testwebapp.acunetixexample.com).
Create a user for CircleCI to connect to the Deployment Environment
- Log in to your Deployment Environment as the root user. Create a user without a password for login.
useradd -m -d /home/circleuser -s /bin/bash circleuser |
- Create an SSH key without a passphrase for the circleuser.
ssh-keygen -m PEM -t rsa -f ~/.ssh/circleuser |
- Add the newly-created public key to /home/circleuser/.ssh/authorized_keys
mkdir -p /home/circleuser/.ssh chown -R circleuser:circleuser /home/circleuser |
- Show the contents of the private key using:
cat ~/.ssh/circleuser |
- Copy the contents of the private key. You will use the private key to allow your CircleCI to log in to your Deployment Environment.
Generate a set of SSH keys for the user to authenticate against GitHub
- Log in to your Deployment Environment as the circleuser user. Create new SSH keys without a passphrase.
ssh-keygen -t rsa |
- Display the public key in the console and copy it for later.
cat ~/.ssh/id_rsa.pub |
- Log in to your GitHub account, navigate to your application's repository, and click Settings.

- Select Deploy keys from the side menu.

- Click Add deploy key.

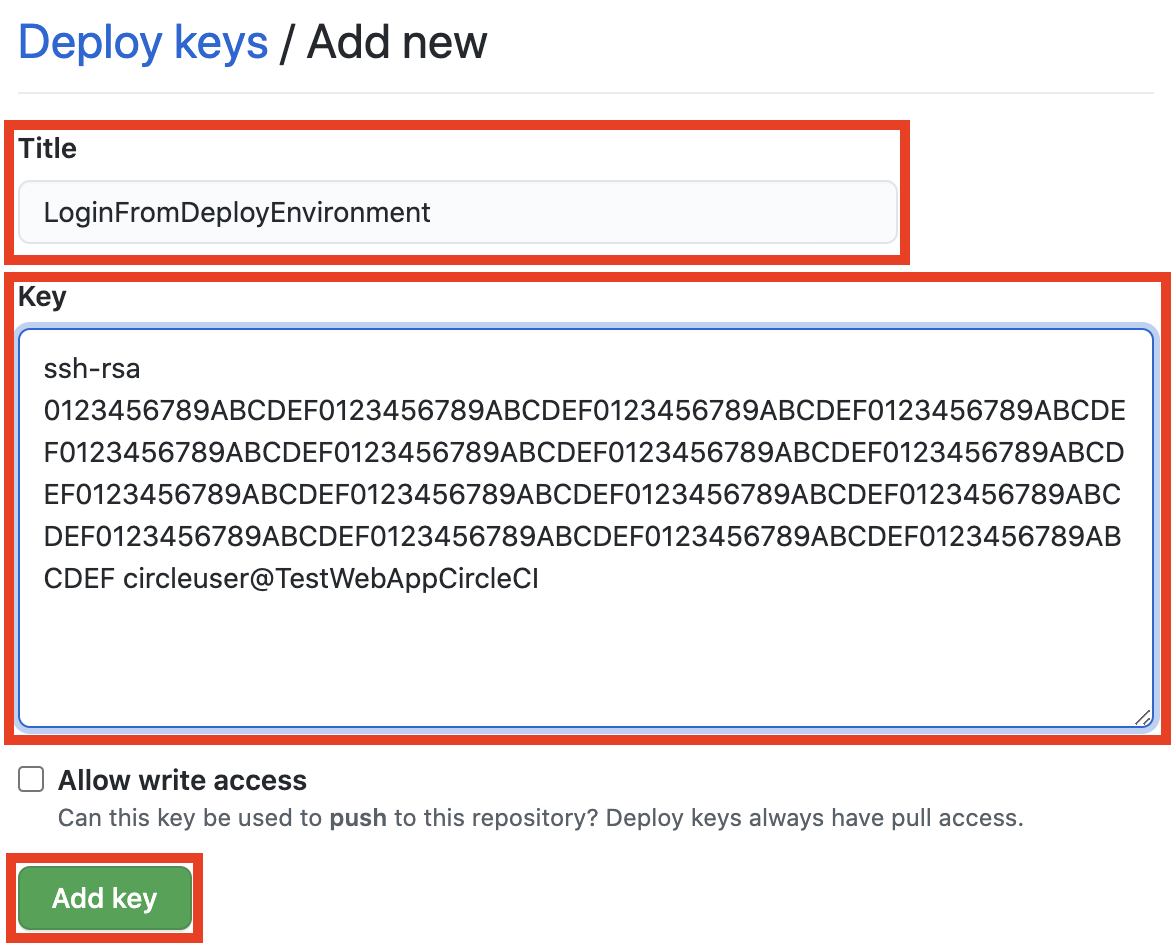
- Add new Deploy key:
- Set the Title field to "LoginFromDeployEnvironment" (or any other memorable name).
- Paste the contents of the public key you copied earlier into Key field.
- Click Add key.
Configure Firewall Access for SSH and HTTP
Allow SSH and HTTP traffic through the firewall.
- Log in to your Deployment Environment and run the following:
sudo ufw allow OpenSSH sudo ufw allow 80 sudo ufw enable |

Set up the Project
- Ensure Node.js, npm, and pm2 are installed on your Deployment Environment.
sudo apt install npm sudo npm install -g pm2 |

- To configure your development environment, follow these steps:
- Log in to your Deployment Environment as the circleuser and clone the project source code.
git clone https://github.com/acunetix-test/testwebapp.git # Replace with your repository URL in the following format: https://github.com/your_user_name/your_application_name.git |
- Start up your Node app using pm2 to register the process.
pm2 start ~/testwebapp/app.js |

- Create a "deploy.sh" file.
touch ~/deploy.sh chmod +x ~/deploy.sh nano ~/deploy.sh |
- Add the following lines to your deploy.sh file:
#!/bin/bash #replace this with the path of your project on the VPS cd ~/testwebapp #pull from the branch git pull origin main pm2 restart ~/testwebapp/app.js |
Step 5: Integrate CircleCI with GitHub
Set up the CircleCI Project
- Login to your CircleCI account.
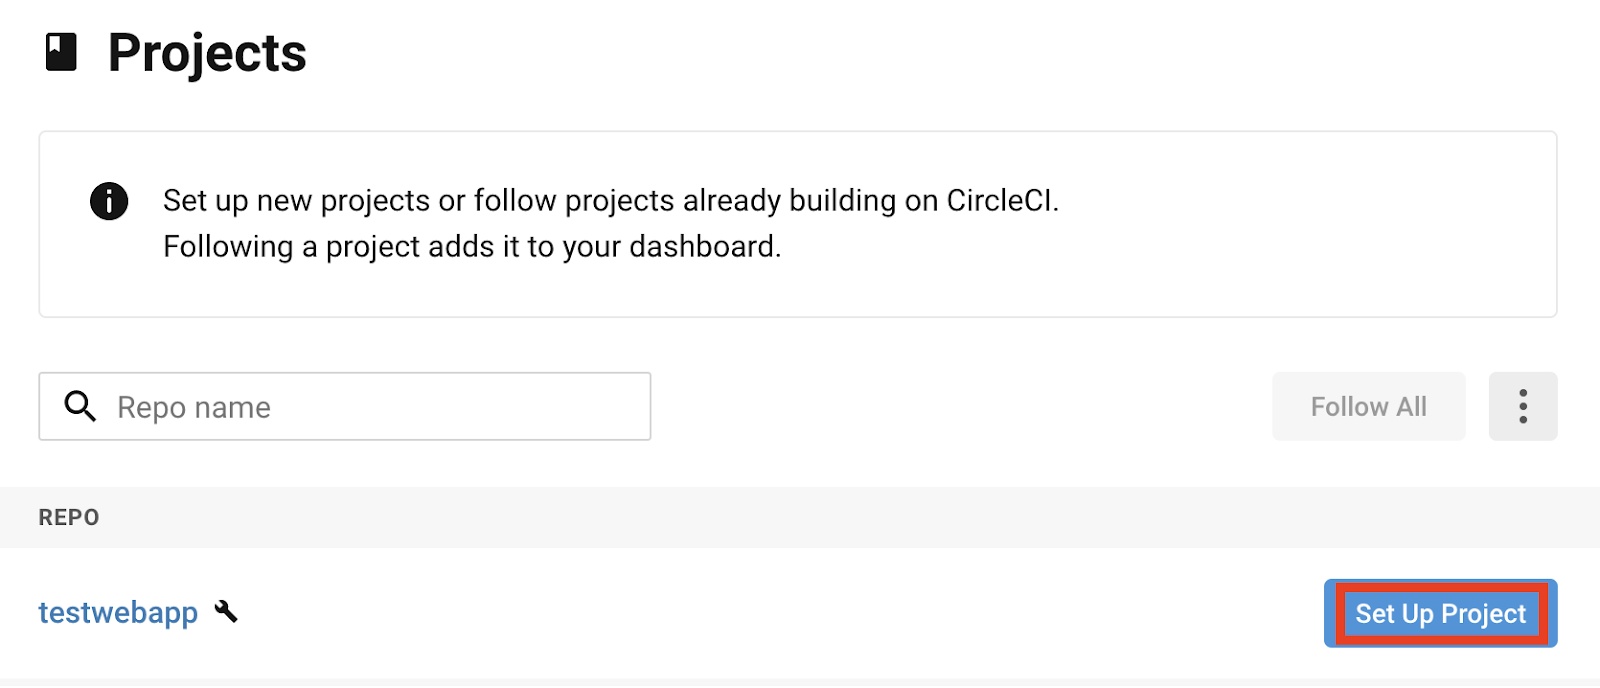
- Go to your list of projects and click on SetUp Project for the project you wish to work with. In this example, our project is called "testwebapp".
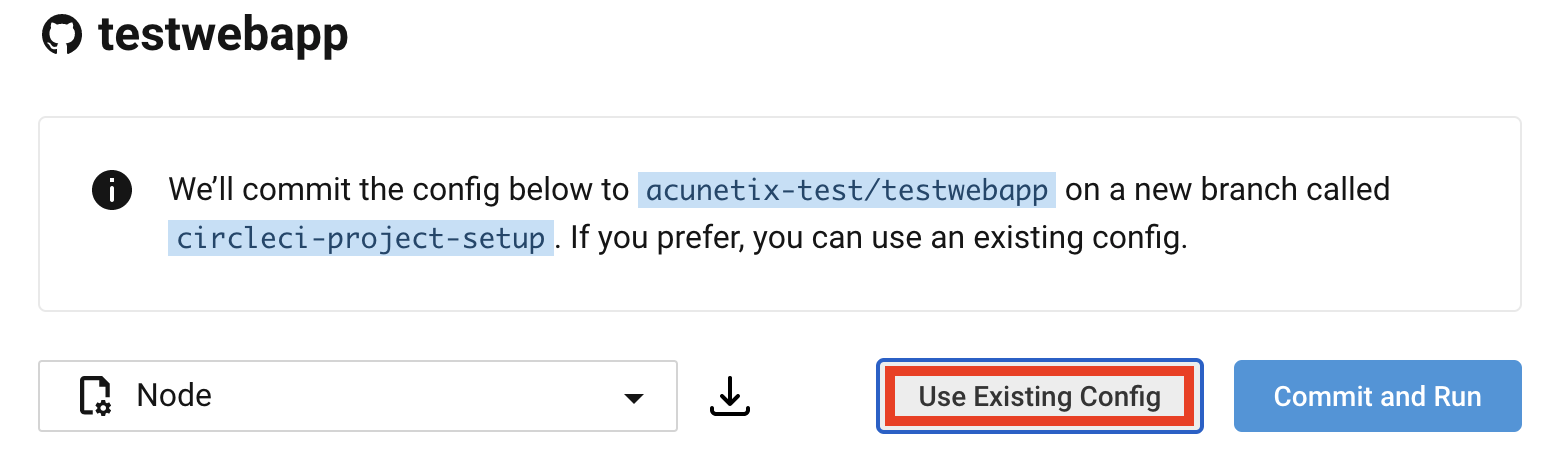
- Click Use Existing Config (you have already created a config.yml in the repository).
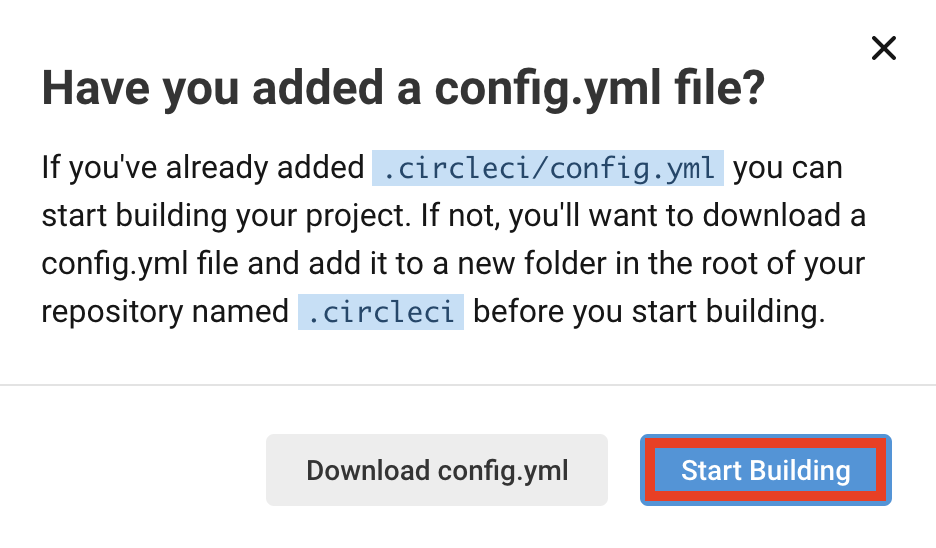
- Click Start Building. This will use the config.yml from your repository and will immediately trigger the first build and send you to the pipeline page. This initial build will fail because you need to perform some additional steps in the section below.
Configure an SSH Key for CircleCI to connect to the Deployment Environment
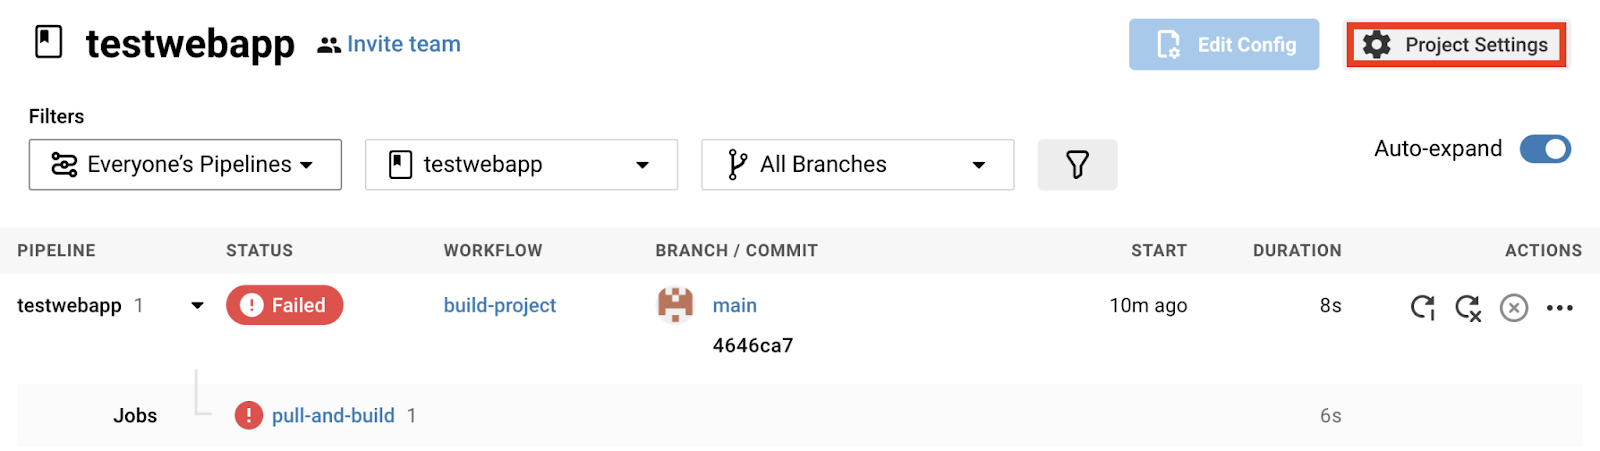
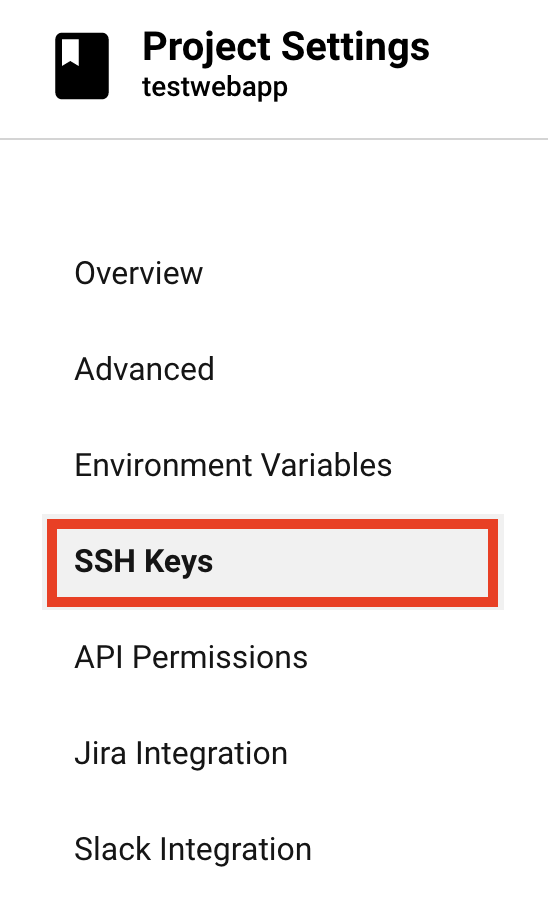
- From your application's pipeline page, click Project Settings.
- Select SSH Keys from the menu.
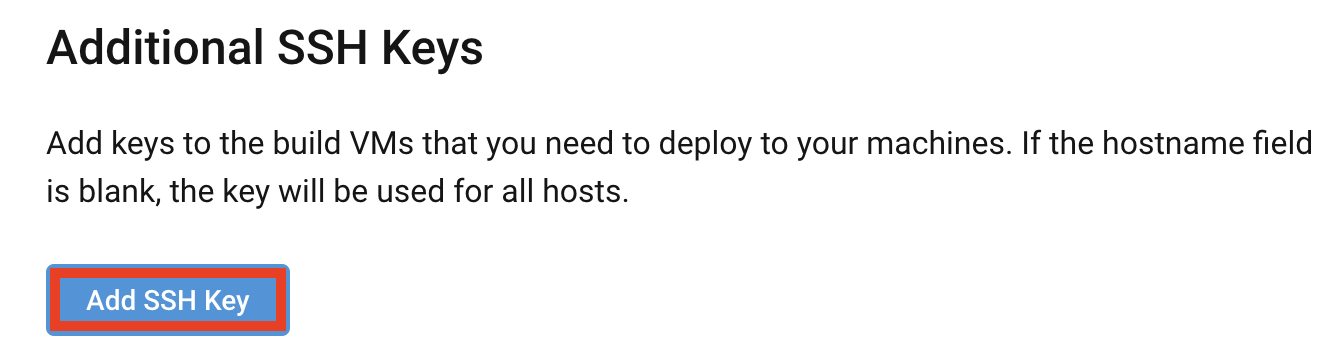
- Click Add SSH Key.
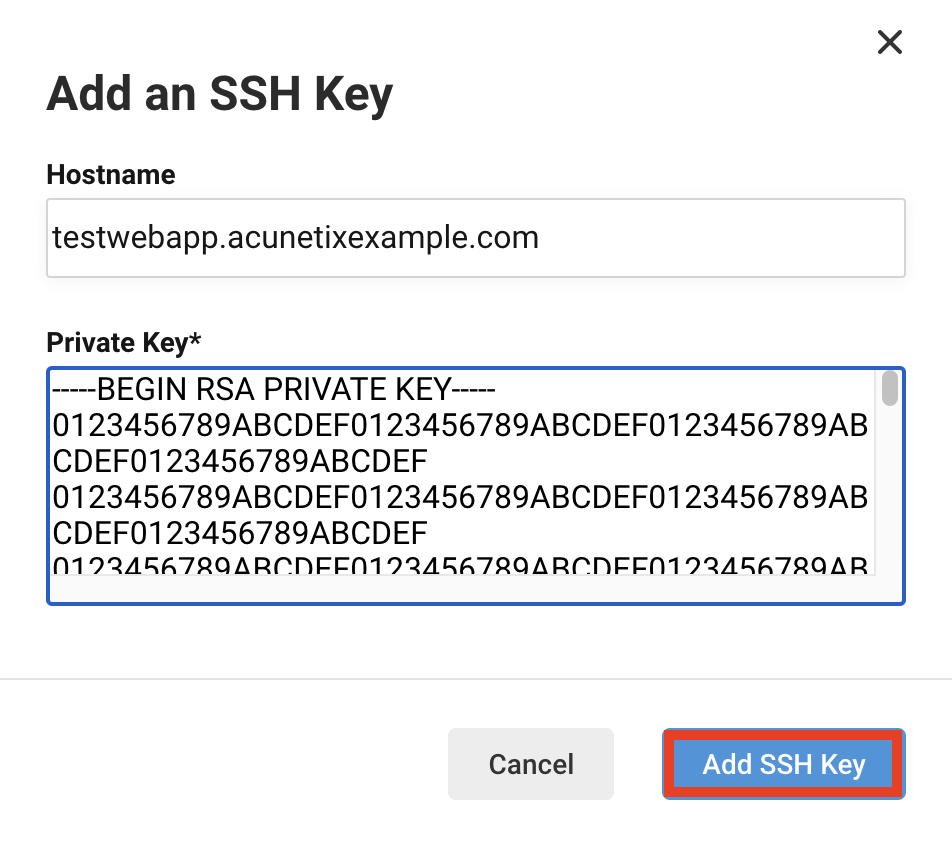
- Enter the Hostname for your Deployment Environment (in this example we used testwebapp.acunetixexample.com).
- Enter the Private Key which you copied from your Deployment Environment.
- Click Add SSH Key.
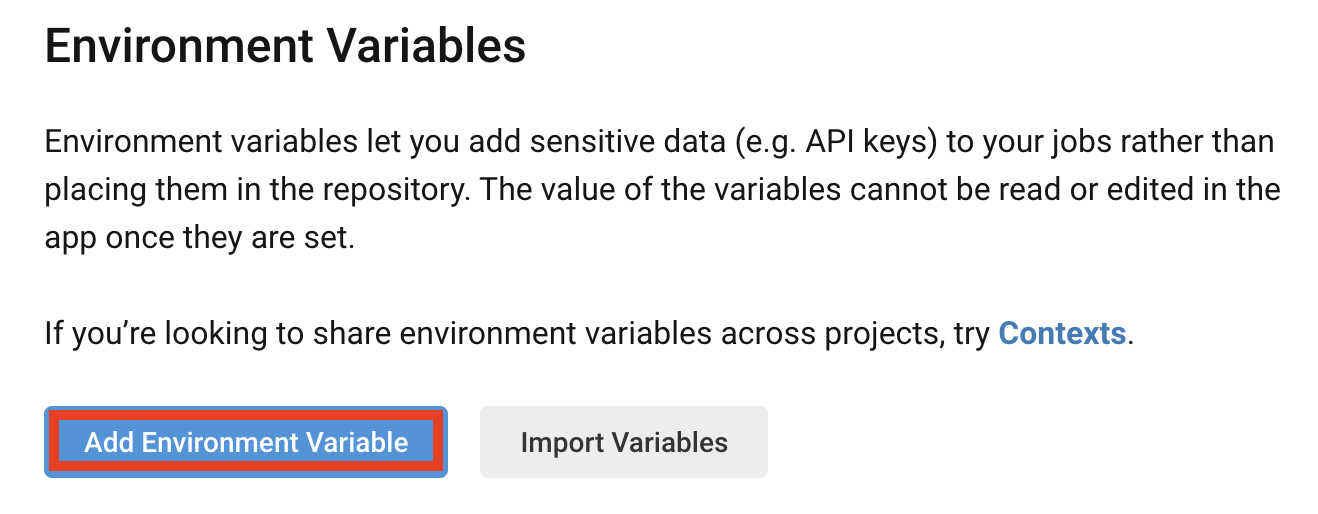
Configure Environment Variables
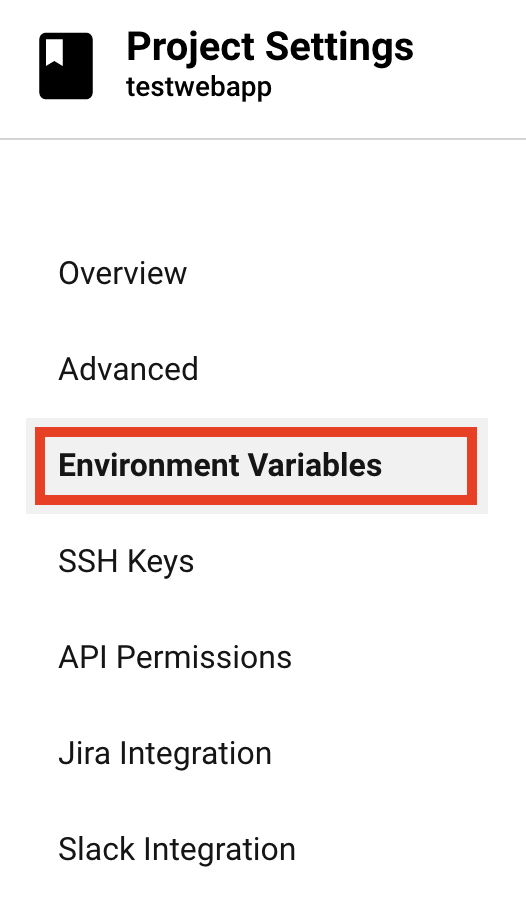
- From your application's pipeline page, click Project Settings.
- Select Environment Variables from the menu.
- Click Add Environment Variable.
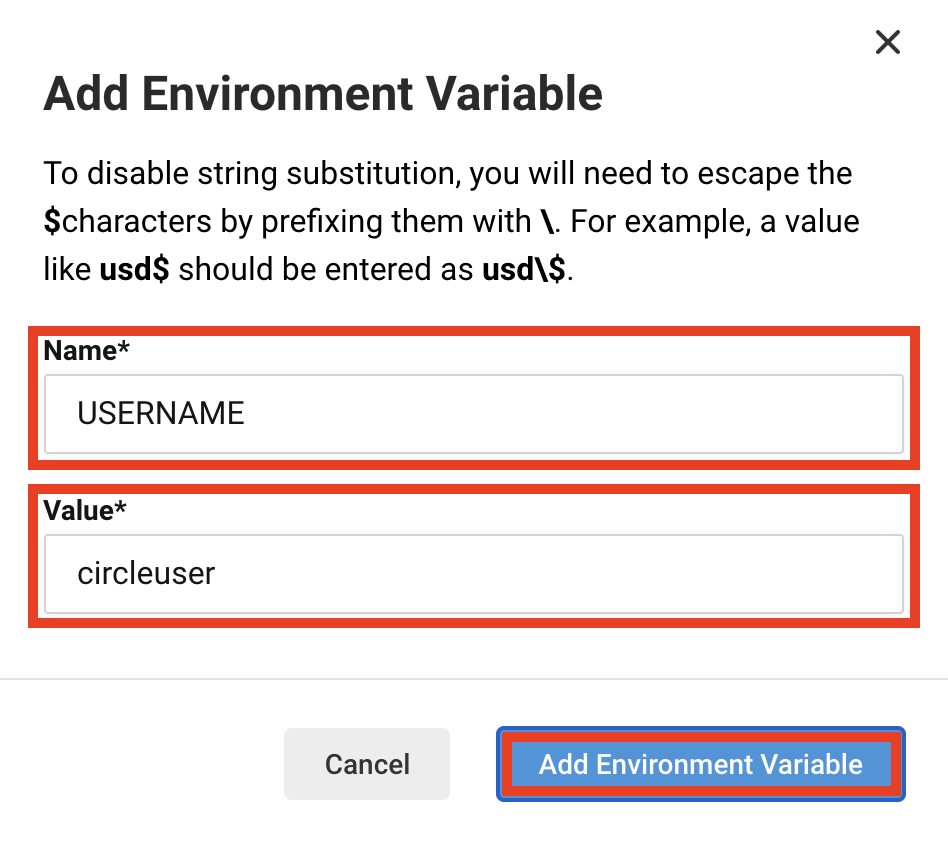
- Add an environment variable for the "circleuser" you created earlier in the Deployment Environment:
- Set the Name field to "USERNAME"
- Set the Value field to "circleuser"
- Click Add Environment Variable
- Add an environment variable for the IP Address or the hostname of your Deployment Environment. In this example the hostname is "testwebapp.acunetixexample.com".
- Set the Name field to "HOSTNAME"
- Set the Value field to "testwebapp.acunetixexample.com"
- Click Add Environment Variable

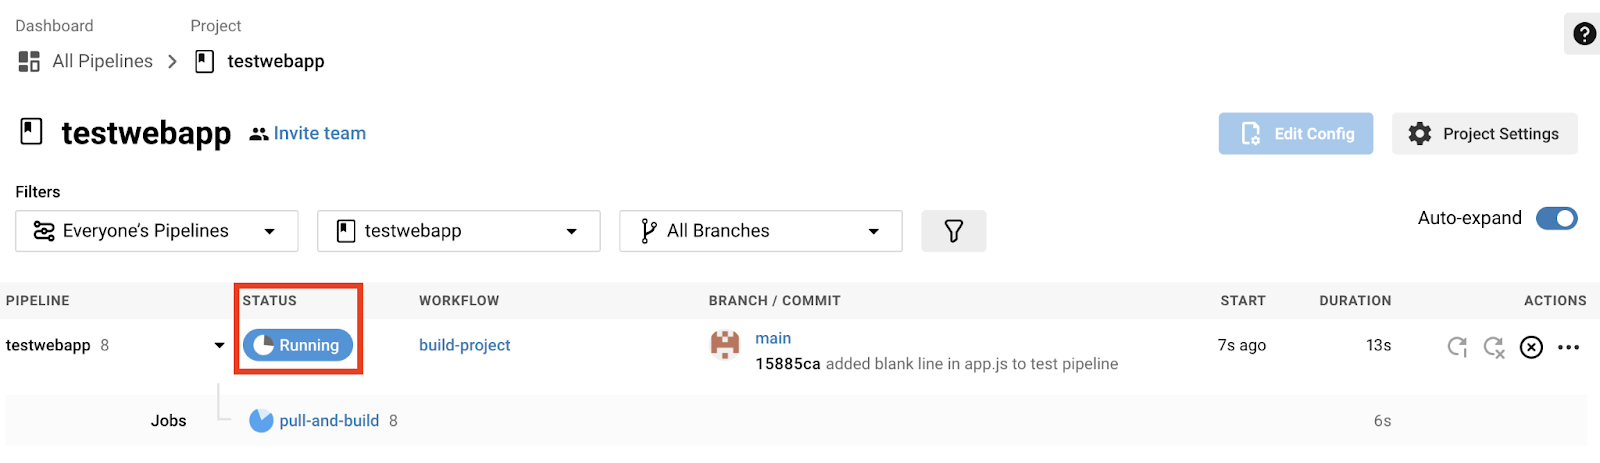
Step 6: Test the Pipeline Workflow
The main test to check everything is working correctly is to simply make a change to the source code, commit the changes, and push the changes to GitHub. This will show up in your CircleCI pipeline page:
Step 7: Integrate with Acunetix
Finally, you need to edit the deploy.sh file in your Deployment Environment to add instructions to trigger an Acunetix scan of your Web Application Target after every build.
- Login to your Deployment Environment as the circleuser.
- Edit the "deploy.sh" file:
nano ~/deploy.sh |
- Add the curl line to your deploy.sh file to trigger the scan; the final file should look like this:
#!/bin/bash #replace this with the path of your project on the VPS cd ~/testwebapp #pull from the branch git pull origin main pm2 restart ~/testwebapp/app.js curl -k -i --request POST --url "https://online.acunetix.com/api/v1/scans" --header "X-Auth: [APIKEY]" --header "content-type: application/json" --data '{"profile_id":"11111111-1111-1111-1111-111111111111","schedule":{"disable":false,"start_date":null,"time_sensitive":false},"user_authorized_to_scan":"yes","target_id":"[Target ID]"}' |
- Replace the 3 highlighted fields:
- [APIKEY] - To set the correct X-Auth value, replace the "[API KEY]" text with the API key you retrieved in the first section from Acunetix.
- Profile_id - The suggested value for profile_id is "11111111-1111-1111-1111-111111111111" - this default value is for a Full Scan. If you wish to specify a different scan profile, you can set one of the following values:
- For Acunetix Online
- Full Scan: 11111111-1111-1111-1111-111111111111
- High Risk Vulnerabilities: 11111111-1111-1111-1111-111111111112
- SQL Injection Vulnerabilities: 11111111-1111-1111-1111-111111111113
- Weak Passwords: 11111111-1111-1111-1111-111111111115
- Cross-site Scripting Vulnerabilities: 11111111-1111-1111-1111-111111111116
- Crawl Only: 11111111-1111-1111-1111-111111111117
- Malware Scan: 11111111-1111-1111-1111-111111111120
- Full Web and Network Scan: 11111111-1111-1111-1111-211111111111
- Network Scan: 11111111-1111-1111-1111-211111111112
- Network Scan (Safe Checks): 11111111-1111-1111-1111-211111111113
- Network Scan Quick: 11111111-1111-1111-1111-211111111114
- For Acunetix On-Premises
- Full Scan: 11111111-1111-1111-1111-111111111111
- High Risk: 11111111-1111-1111-1111-111111111112
- SQL Injection Vulnerabilities: 11111111-1111-1111-1111-111111111113
- Weak Passwords: 11111111-1111-1111-1111-111111111115
- Cross-site Scripting Vulnerabilities: 11111111-1111-1111-1111-111111111116
- Crawl Only: 11111111-1111-1111-1111-111111111117
- High / Medium Risk: 11111111-1111-1111-1111-111111111119
- Malware Scan: 11111111-1111-1111-1111-111111111120
- Custom scan profile: Alternatively, you can use the scan profile id of any custom scan profiles you may have created. You can retrieve the scan profile id of custom scan profiles via the Acunetix API, or by navigating to the custom scan profile, and checking the URL.

- Target_id - To set the correct target_id value, replace the "[Target ID]" text with the target ID you retrieved from Acunetix in the first section.
All future commits will now also trigger a scan request to Acunetix.