Configuring Targets

Targets are the websites and web applications that you would like to scan using Acunetix. In Acunetix, you can also configure Network assets as Targets. These need to be configured in Acunetix before they can be scanned. Once configured, a Target can be scanned as often as required.

This guide shows you how to configure the settings for Targets after you have added them to Acunetix.

Configuring Target Settings

A Target's basic details are listed at the top of the Target Settings page. To access this page:

  1. Select Targets from the Acunetix menu.
  2. Click on a Target Address from your list of Targets.

The sections below explain each of the configuration options available on the Target Settings page.

Business Criticality

You can assign a different level of business criticality (Low, Normal, High, Critical) from the default labelled Normal. This will give you the opportunity to filter scans and vulnerabilities based on this metric, allowing you to focus on the more critical items in your web inventory if necessary.

Default Scan Profile

Every time you start a scan on a target, you can specify the scan profile to use, with the default scan profile being Full Scan. You may decide, however, to change the default scan profile for a particular target. For example, if you consider one of your targets to be a Low Business Criticality target, you may set your default scan profile for that target to be the High Risk profile; following this change, every time you launch a scan on this target, the default scan profile will be set to High Risk.
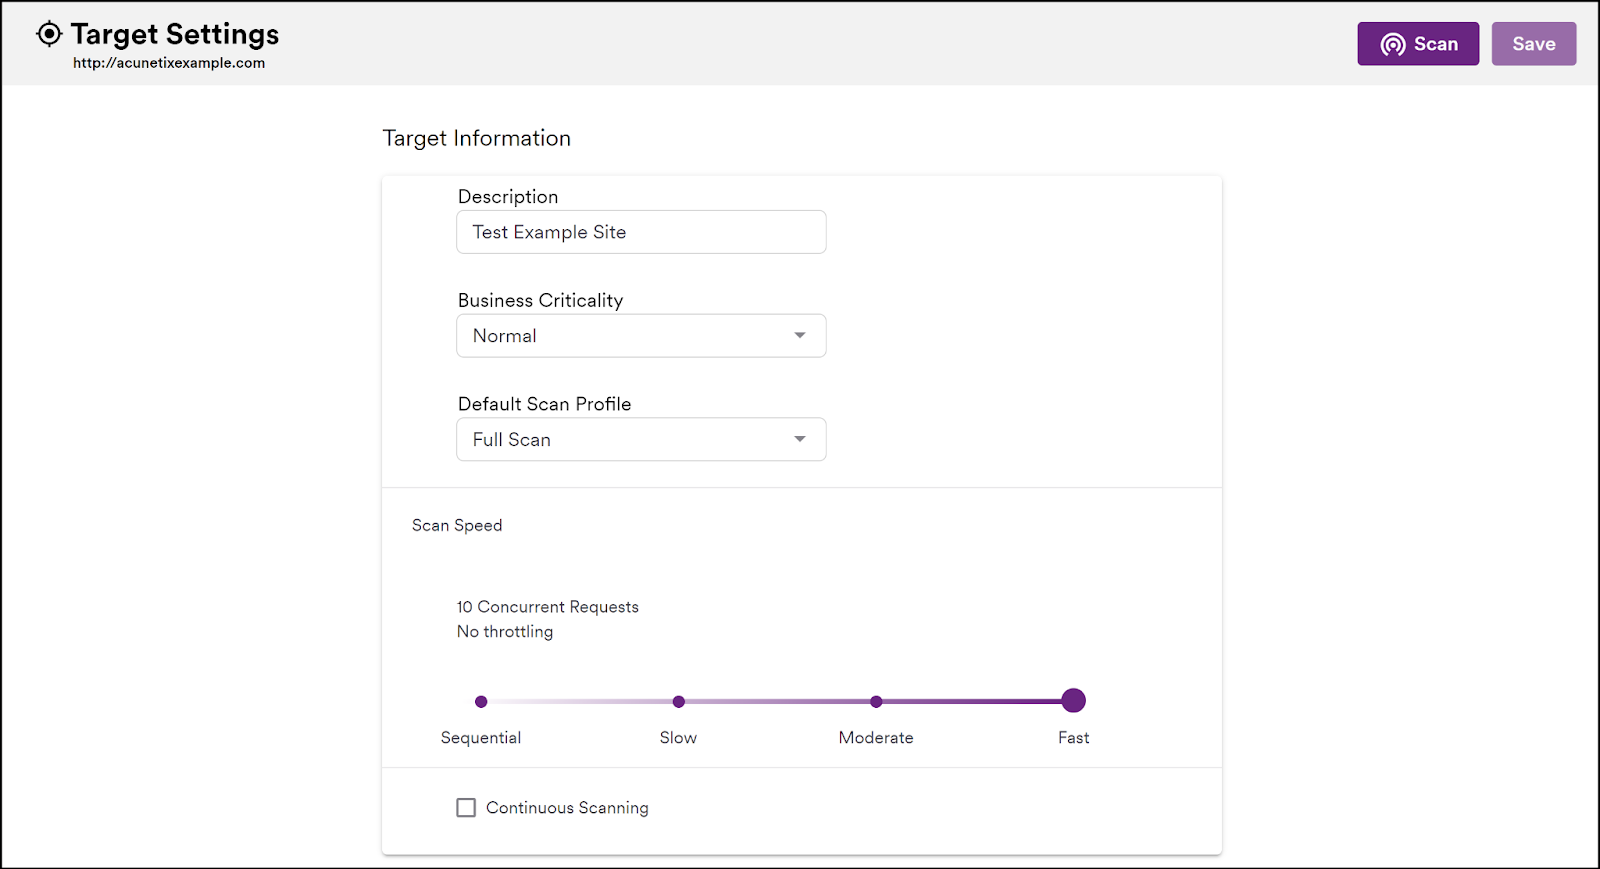
Scan Speed

Your target may be adversely affected by high speed or high intensity (simultaneous requests) scans, or may trigger defence mechanisms that invalidate your scan results. You can adjust the scan speed to one of the following:

  • Fast (default) — 10 concurrent requests, no throttling
  • Moderate — 5 concurrent requests, send requests every 20 milliseconds
  • Slow — 2 concurrent requests, send requests every 50 milliseconds
  • Slower — 1 concurrent requests, send requests every 120 milliseconds

Configuring Site Login

You may need to scan restricted areas within the web application configured as a Target in Acunetix. The information used to access the restricted area can be configured from the Site Login options found in the General Settings within the Target's configuration.

Automatic Login

In most cases, you can select to have Acunetix try to auto-login into the site. This will work for most web applications which use a simple login process. You need to provide the Username and Password to access the restricted area. The scanner will automatically detect the login link, the logout link and the mechanism used to maintain the session active.


Using the Login Sequence Recorder

For more complex web applications, which might be using a more elaborate login mechanism, you need to Launch the Login Sequence Recorder (LSR) and record a login sequence (*.lsr file), which can then be uploaded and saved with your Target settings.

A Login Sequence is used to perform the following tasks during the crawling and scanning phases:

  • Access form-based password protected area
  • Replay login actions to authenticate to the website or web application
  • Restrict actions which the crawler and scanner can access (such as logout links)
  • Mark actions that require Manual Intervention each time they are accessed, such as pages with CAPTCHAs, one-time password and two-factor authentication.

A new Login Sequence can be created by following the steps below:

  1. Select Targets from the Acunetix menu.
  2. Click on a Target Address from the list of Targets for which you wish to record a Login Sequence.
  3. Click the toggle to enable the Site Login panel.
  4. Select Use pre-recorded login sequence.
  5. Click New to launch the Login Sequence Recorder.

By default, the LSR will browse to the Target URL that you are configuring the Login Sequence for.

You may start browsing the login page and perform a successful login. Remember to use correct and valid credentials. With each action that is recorded, the panel on the right will start to be populated with login actions. Since the LSR is recording actions and not HTTP requests, it also works with web applications that make use of anti-CSRF tokens.

Once logged in, you may wish to replay the actions to ensure that the Login Sequence is valid and is logging in successfully. This can be done by clicking on Play at the bottom-left of the screen.

The right-hand-side pane shows a list of actions that have been recorded. Clicking on a specific action will reveal Action Properties on the bottom right-hand-side of the screen. Click next to record restrictions.

Manual Intervention

NOTE: This feature is not available in Acunetix Online.

Some login pages require additional steps before the "Login" process can be completed – some examples would be CAPTCHA, Two-Factor Authentication (2FA) or Multi-Factor Authentication (MFA), and other one-time password (OTP) mechanisms. As you record your login sequence, you will encounter the point where you need to intervene manually to perform a step that cannot be automated. When you encounter this point, select the "manual" option.

The LSR will keep track of this; when you are performing a scan, Acunetix will pause and prompt you for your Manual Intervention with a popup notification.

When you have completed the Manual Intervention actions, make sure that any actions created by the LSR that are part of the Manual Intervention process are deleted by selecting each superfluous action, and deleting it by clicking on the (delete) icon.

Now you can simply continue with the recording of the remaining Login Sequence actions.

Recording Restrictions

Restrictions instruct the Crawler and Scanner not to follow specific links during a scan. Typically, you would want to restrict logout links or other links that might destroy a valid session in order to ensure that the scanner does not get logged out during the scan. The LSR also supports restrictions on HTTP methods commonly used in RESTful web services such as PATCH, PUT, DELETE in addition to the standard GET and POST requests.

If the link you are restricting contains a nonce or a one-time token, you may use wildcards (*) to restrict links with changing values. A Restriction may be set by following the steps below.

  1. Click on the link that you wish to restrict.
  2. Upon clicking the link, a dialogue will pop up asking if you wish for Acunetix to either
  1. Intercept this request (either in its exact form or by using wildcards)
  2. Forward such requests which match this request
  3. Forward all requests, meaning that there will be no restrictions
  4. In this example, we do not need to make any modifications to the Restriction, therefore we can select the first option – Restrict request using exact match
  1. The Restriction will be recorded, and shown in the panel on the right. You may add as many restrictions as you need.

Identifying a Valid Authentication Session

In the final step, the LSR will try to identify a valid session automatically. The session pattern is required, so that the Scanner will be able to know the difference between an invalid (logged out) and a valid (logged in) session. If the scanner is able to know that the session has been invalidated, it can replay the login sequence and validate the session again.

This is done by comparing the logged in and logged out states of the web application. There may be cases where no difference can be identified automatically. In such cases, you will need to either configure it by navigating to pages and let the LSR identify the pattern, or it can also be done manually. In addition to authentication mechanisms that rely on cookies, the LSR also supports authentication mechanisms that rely on HTML5 LocalStorage.

You can identify a valid authentication session while navigating:

  • This can be done by browsing to authenticated areas of the website that will return a different response depending on the user being logged in or logged out.
  • For example, a response from the website will contain the text “Logout” if the user is logged in. If it is not found in the response, the user is not logged in.

Manually Configuring User Session Pattern

If Acunetix is still unable to identify a user session pattern, you will have to configure one manually. The important point is that the responses sent by the web server will differ between those of a logged-in user and those of a user that is NOT logged in. Your task is to identify a reliable difference that the scanner can use to verify whether or not it is logged into the site.

When you have identified and configured the session pattern, it may be verified by clicking Check Pattern at the top of the right-hand-side panel.

Once you click on Finish you will be returned to the "Target Information" page. Click on the "Save" button to upload this saved login sequence file onto the Target Information page.

There are 3 main options for session pattern validation.

Option 1: Identify a visual difference on one of the web pages — some web pages will show, for example, a "Your Basket" link, only to logged-in users; some will show the name of the logged-in user (which obviously would not appear if there is no user logged-in). In such cases, you can instruct the LSR which page to go to by simply typing in something like this in the Session Validation Request text area:

GET https://juice-shop.herokuapp.com/profile HTTP/1.1

...and setting the dropdown labelled "Session VALID if:" to "pattern is found in response" to the logged-in specific text or user name:

Option 2: Identify a difference in the HTTP Response Headers in the logged-in web pages compared to the not-logged-in version. You can check this with Google Chrome, for example, by using the "Inspect" feature; the "Network" tab will show a "Response Headers" section that could include a header such as "X-Logged-In: true", but would be absent or have a different value such as "X-Logged-In: false":

Now you can set the dropdown labelled "Session VALID if:" to "pattern is found in headers" to the identified header value:

Option 3: Identify a web page that receives a numeric response when logged in (typically 200), and some other response when not logged in, such as a 404 (not found) or a 500 (server error). Set the dropdown labelled "Session VALID if:" to "status code is" to the valid value:

OAuth Login

Acunetix supports the OAuth2 authentication mechanism, allowing you to configure targets for web applications that require OAuth2. A new OAuth Login Sequence may be created by following the steps below.

  1. Select Targets from the Acunetix menu.
  2. Click on a Target Address from the list of Targets for which you wish to record a Login Sequence.
  3. Click the toggle to enable the Site Login panel.
  4. Select Use OAuth for this site. This will expose the configuration fields.
  5. Set the Grant Type to one of the OAuth2 Authentication Flow mechanisms. The supported Grant Types are:
  1. Authorization Code
  2. Implicit
  3. Client Credentials
  4. Password Credentials
  1. Set the Access Token URL and the Authorization URL (only for the Authentication Code Grant Type) for the Authentication Provider. You can obtain the URL(s) from the Authentication Provider (eg. Google or Facebook).
  2. Set the Redirect URI for your target. This is the URI which the user will be redirected to after completing the login process with the Authorization provider.
  3. Set the Client ID and Client Secret fields for your target. These are unique values assigned to your web application by the Authentication Provider when you registered your web application with the Authentication Provider for its login functionality.
  4. Some OAuth2 authentication flows require the State field to be populated.
  5. Set the Scope field to a space-delimited list of elements for which permission is being requested.
  6. Some OAuth2 authentication flows require the Username and Password fields to be filled in.

OAuth2 authentication flows that require a 3-legged sequence, such as filling username and/or password fields in a separate step, or requiring clicking on a Confirm or Allow button, are also supported. Clicking on the 3-Legged Sequence button will launch the Login Sequence Recorder window to present the OAuth2 Authentication Provider's dialog.

When you have completed the login sequence, the window will close automatically.

Click on Save at the top of the Target Settings page to save your Target's settings.

Using the Business Logic Recorder

Many web applications today utilise dynamically expanding or multi-step or multi-page forms. This means that a "first stage" form is presented to the user, and when the user inserts information into this first stage, this information will determine how the form will change, in the next step or page.

We very often see these types of forms in air travel web applications, and in highly interactive shopping carts – these are just two examples. The reality is that these multi-step forms are becoming common, and the Business Logic Recorder provides the tools necessary to create a string of actions for the scanner to follow to properly navigate multi-part forms.

Generating and Installing AcuSensor

AcuSensor improves the scan results provided by Acunetix by being able to identify all the pages on your website, increases the information about the vulnerabilities detected and decreases false positives. Check the relevant sections for more detail about deploying AcuSensor into a target web application.

Reset AcuSensor Token

If for some reason you wish to change the built-in token (similar to a unique key or password) for an AcuSensor Agent (to invalidate an old token, or to use the same AcuSensor Agent file for more than one target, for example), you will need to:

  1. Edit the target.

  1. Navigate to the lower half of the AcuSensor panel.
  2. Click Reset for Target.

Now the new AcuSensor Agent for the target will contain a new unique strong built-in token. This means you will need to redeploy the AcuSensor Agent to your target web application before starting a new scan.

Scanning for vulnerable software components - SCA

Software Composition Analysis (SCA) is an important part of application security testing. Today's web applications deliver rich functionality through the use of multiple open-source components. Like all software, open-source components are subject to vulnerabilities, and each component will have a development path typically tracked with version numbers. SCA is the process of analyzing an application’s source code to identify open-source components and their version numbers, and comparing this list with a master database that contains known components with version numbers and vulnerability exposures.

Scanning a target with SCA functionality

Acunetix provides an SCA server with a master database of open source components as part of Acunetix Online Services. You must ensure that Acunetix Online Services are enabled for your Acunetix installation before SCA analysis can occur; go to your profile page to check this:

When an application is scanned with Acunetix, the AcuSensor agent deployed to the application will analyze the application, create an inventory of components being used, and submit the inventory to the SCA server for comparison. The SCA server will then respond to Acunetix if it finds any components with known vulnerabilities.

Other Advanced Options

For each Target, you can configure other options, including:

  • Crawling options, such as using a custom User-Agent
  • Paths to be excluded when scanning the specific target
  • HTTP Authentication
  • Client Certificates
  • Custom Headers
  • Custom Cookies
  • List of Allowed hosts, which will be scanned when scanning the specific Target. Note that these need to pre-configured as separate Targets beforehand
  • Knowledge Base for each Target, collecting information about URLs, vulnerabilities, and other information, that is accumulated with each scan on the Target
  • Excluded Hours profile


« Back to the Acunetix Support Page